Using the Juris 1099 Utility
To utilize the Juris 1099 Utility:
- Download and unzip the appropriate version of the 1099 utility. (The version number of the utility should match your Juris version number.)
- From the downloaded file, extract the utility Juris_1099.exe and place in the Juris\bin folder where Juris.exe is located on the workstation where the utility will be run.
- To launch the utility, double click on Juris_1099.exe in the \bin folder.
The Juris 1099 Utility is used to print 1099-MISC forms and the 1099 Report. Before printing 1099s, please note:
- 1099s must be printed on a laser printer. We recommend the forms be placed in the paper bin instead of the manual feed tray.
- Checks created and posted in Juris during 2010 in addition to the Supplemental Amount (added or subtracted) constitute the 1099 amount that prints in only one of the 1-14 boxes on the 1099 forms.
- The 1099 form only allows room for two lines of the Vendor’s street address. (This has no affect on the Vendor name or city/state/zip.) If there are Vendors with multi-line street addresses, the address may need to be edited in Juris’ Vendor’s Address tab to move important street address information to the first two lines.
- The Adjust Top Margin field used with the Tools/Print Test Page function helps to ease alignment of 1099-MISC forms.
- We recommend first printing the 1099s on plain paper in order to review prior to printing on the IRS forms.
Note
For information on who should receive a 1099-MISC, please refer to the instructions on the IRS web site: http://www.irs.gov/instructions/i1099msc/index.html
Set up to print 1099s by entering the following:
- Firm’s Federal Tax Identification Number = Your firm’s tax ID number which must be entered in the format ##-#######, i.e., include the hyphen.
- Threshold Amount = The amount which determines when 1099s are required. (For example, in 2007, Vendors who were paid $600 or more were required to have 1099s.) Note: If boxes 2, 4, 5, 8, or 13 are selected on the Vendor Information tab, those 1099 amounts will disregard the Threshold and the 1099 will be printed no matter what the amount.
- Begin with = If a single Vendor or range of Vendors needs to be printed or re-printed, you have the option to enter the Beginning Vendor Code. The drop-down list button will display only those Vendors in Juris who have “Gets 1099” checked and the range that prints will only include those with “Gets 1099” checked.
- Print through = If the Beginning Vendor code was specified, then an ending Vendor code may also be entered. The drop-down list button will display only those Vendors in Juris who have “Gets 1099” checked.
- Select Year to Print = The default year is pulled from your Juris database.
- Sort by = Sort options are Vendor Name, Vendor Tax ID, and Vendor Code. This affects sorting of both the 1099s and the 1099 Report.
-
Firm’s Address = Enter the firm’s address for the appropriate 1099’s Payer information. It can either be keyed, or the address can be selected using the drop-down list button. Note that:
- Using the drop-down list will insert the Firm Name (defined in Juris’ Setup and Manage) as well as the Office address. If you also have the firm name in the Office address, you will need to delete one of the lines after selecting the address. Edits made here will not affect the address within Juris.
- Only six lines will print in the Payer’s box so if the Firm Name wraps to a second line, that leaves four lines for the address and phone number.
- Verify the Firm’s phone number is in one of the address lines or you’ll have to type it on the forms after the 1099s are printed.
- Destination = Printer where the 1099-MISC forms and/or the 1099 Report is to be printed. The 1099-MISC forms must be printed on a laser printer. We highly recommend you put the forms in the paper tray instead of the manual feed because the forms seem to align more consistently when pulled from the paper tray.
- Number of Copies = Number of copies of 1099-MISC forms that need to be printed. (This field does not apply to the 1099 Report or the 1099 Test Page.)
-
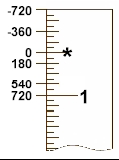
Adjust Top Margin = There is a new option to move the forms up or down as much as ½ inch in either direction so the forms can be aligned correctly on specific printers. A range of –720 to 720 units may be entered. To move the form down, enter a positive number. To move the form up, enter a negative number. The diagram below is to assist with determining the appropriate adjustment. ½ inch is equivalent to 720 units.
-
Print Compensation Amounts = If you accept the default checked to print compensation amounts, a 1099 will print for those Vendors in Juris who have “Gets 1099” checked and one of these options:
- Have a total check amount paid (and posted) for the year that meets or exceeds the Threshold amount (e.g. $600 was the threshold in 2007)
- Supplemental amount for the year is greater than or equal to the Threshold amount;
- Either Box 2, 4, 5, 8, 13 or 14 is selected for the vendor.
You have the option to uncheck the box to “Print compensation amounts” which will create 1099s WITHOUT dollar amounts. This will print a 1099 for all vendors in Juris that have “Gets 1099” checked and had activity in the year selected, ignoring if they’re under the Threshold limit. Note that if this option is used, you will need to manually fill in the dollar amounts for the appropriate Vendors after the 1099s have been printed.
-
Truncate SSN = Select this check box to truncate the vendor's Social Security Number on the printed 1099 form or 1099 report. When selected, the first five digits of the SSN will be replaced with X's.
This practice is optional. If used, it should be applied only to the payee's copy of the 1099 form, according to IRS guidelines.
Note
This only applies to vendors where Social Security Number has been selected as the Tax ID type.
Vendor Information
A Vendor Code and Vendor Name is displayed for each vendor who has “Gets 1099” checked in the Vendor in Juris and had activity in the year selected. Click on the column headings for Vendor or Vendor Name to sort the spreadsheet by that item. Sorting here does not affect the sort order when printing 1099 forms or 1099 report.
Print in Box = Options to print 1099 amounts are: 1 through 8, 10, 13 and 14. The default is the value assigned to the Vendor in Juris (Nonemployee Comp. = box 7; Gross proceeds to Atty = box 14). The amount will print in the box listed.
Changing the default box: Changing the Box selection here to either Box 7 (Nonemployee Comp.) or Box 14 (Gross Proceeds to Atty.) will also change it within Juris on the Vendors’ Flags tab. Box selections other than 7 or 14 will not change the vendor. This means if the User closes the utility and reopens it, boxes other than 7 & 14 will not be shown as the value; it will again show the selection from Juris.
Note
If boxes 2, 4, 5, 8, 13 or 14 are selected, those 1099 amounts will disregard the Threshold and the 1099 will be printed no matter what the amount.
Supplemental Amount = If applicable, enter an amount to be added or subtracted from the 1099 value accumulated since setting up the Vendor in Juris. Use a leading hyphen if the Supplemental Amount is to be subtracted, e.g., -250.00. Changing the amount here will also change it within Juris on the Vendors’ Flags tab.
Note
If you paid vendors using a method other than through Juris (either by converting to Juris this year after paying vendors using your previous method; or by adding Disbursements to your Juris system after the first of the year), your current Juris Vendor information may not have complete 1099 amounts. In that case, you would need to calculate the 1099 amounts for Vendors prior to posting payments in Juris and enter that as the Supplemental Amount. This does not include firms who converted from Juris Classic, unless your information was incorrect at the time of conversion.
Print 1099s = Allows the selection of various individual vendors for printing their 1099s. The default has all vendors checked. If the box is unchecked, a 1099 will not print for that vendor. User must save to retain changes to this column. (This feature is helpful for those who have a group of 1099s that need to print in a different box than the others.)
Check All/Uncheck All = Button to quickly check or uncheck all vendors in the “Print 1099s” column.
To Print, perform the following:
- Tools>Print 1099 Report, or use the Print 1099 Report button on the Toolbar. The 1099 Report can be printed multiple times.
- To print the 1099 Test Page, go to Tools>Print 1099 Test Page.
- To print the 1099-MISC forms, go to Tools/Print 1099’s, or use the Print 1099’s button on the Toolbar. The 1099 forms can be re-printed as needed. Again, we recommend that you first print the forms on plain paper to review.
Electronic Filing
If your firm has chosen to process 1099s electronically, the enclosed utility does not support Combined Federal/State Filing. Please make sure the firm has IRS Publication 1220 and the accountant or tax consultant is available on gathering the required information for the electronic processing.
- Transmitter Control Code = 5 digit TCC number assigned by the IRS.
- Test File Indicator = If a test file is being submitted to the IRS, this option will need to be checked. Otherwise, leave blank.
- Foreign Entity Indicator = If the transmitter is a foreign entity, then place a check mark in this field. Otherwise, leave blank.
- Replacement Alpha Character = Required only for replacement files. This information can be found on the Media Tracking slip (Form 9267).
- Contact Name = Enter the name of the person at the law firm who will be the main contact for the IRS if there are questions regarding the files submitted.
- Contact Phone Number & Extension = Enter the area code and phone number of the contact person. Do not enter punctuation such as ‘(‘ or ‘-“. For example, 615-377-3740 should be entered as 6153773740.
- Ext. = If applicable, enter the extension of the Contact person referenced above.
- Contact Email = Enter the email address of the Contact referenced above.
- Electronic File Name For Replacement = If a previously submitted file was rejected by the IRS, and this is the replacement file, please enter the assigned IRS filename here. Otherwise, leave blank.
- Payer Name Control = This can be obtained from the mailing label on the Package 1099 that is mailed to most payers in December. See IRS Publication 1220 for more details.
- Electronic File Type = Choose the File type of Original, Replacement or Correction.
- Export File Name = If filing electronically, the name given to the export file is not relevant. However, if filing by diskette, the filename must be IRSTAX. Please reference the IRS Publication 1220 for details on file names for tape or cartridge media types.